
Description
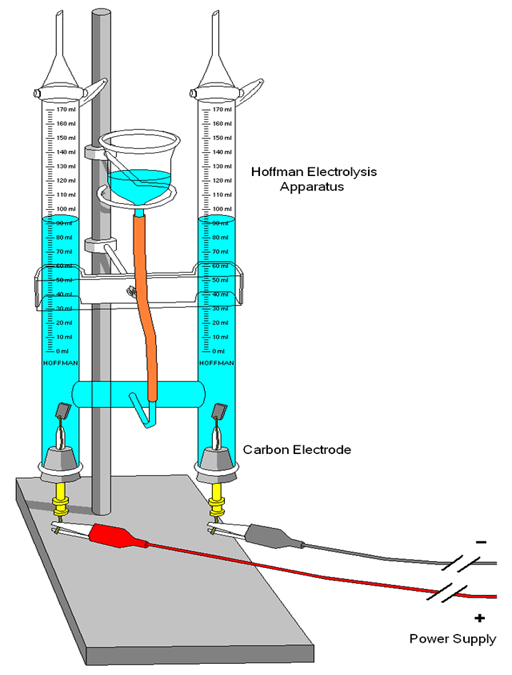
Using electricity, water is decomposed into hydrogen and oxygen gases. A Hoffman electrolysis apparatus separates the two gases and clearly shows the 2 to 1 ratio. When a pH indicator is used, the anode turns yellow and the cathode turns blue. A small pop sound can be produced by burning hydrogen gas, and oxygen can be used to re-ignite a glowing wooden splint.
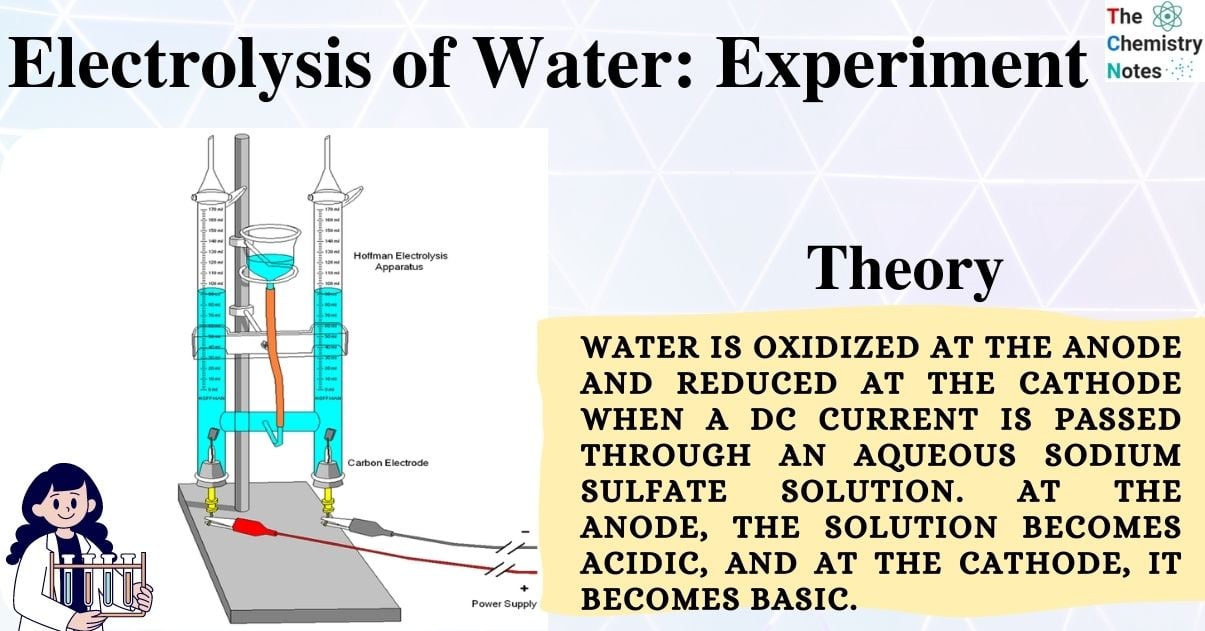
Theory
Water is oxidized at the anode and reduced at the cathode when a DC current is passed through an aqueous sodium sulfate solution. At the anode, the solution becomes acidic, and at the cathode, it becomes basic.
Materials Required
- Hoffman electrolysis apparatus
- 2 electrodes – one is nichrome wire and the other is platinum wire and foil
- DC power supply with clip leads (borrow from EIS)
- Column Stand
- 1 Liter beaker
- 1 Liter of 1 M Sodium Sulfate
- 60 mL of bromothymol blue (optional)
- 10 mL of 1M Hydrochloric acid (optional)
- 10 mL of 1M Sodium hydroxide (optional)
- stirring rod
- Pasteur pipettes
- ruler
- candle
- matches
- 2 test tubes
- wooden splints
Procedure
- Insert the electrodes on the Hoffman apparatus
- Mount the apparatus on the column stand.
- If indicator is needed, add the bromothymol blue to the sodium sulfate. It will turn the sodium sulfate solution blue, but you want it to be green.
- Add drops of NaOH to make more blue and/or HCl to make more yellow until the solution is green.
- Close the stop cocks on the Hoffman apparatus.
- Pour the sodium sulfate into the apparatus through the bulb until the bulb is almost full.
- Open one of the stop cocks and let the solution fill that arm of the apparatus. You may need to add more sodium sulfate solution to make sure that the arm is completely full.
- Do the same for the other side.
- At the beginning of the experiment, clip the black lead from the negative terminal of the power supply to the cathode marked with a +. Clip the red lead from the positive terminal of the power supply to the other electrode (this will be the anode).
- Bubbles should start to evolve on both electrodes. Adjust the power supply to 15-20 volts and 1.5 amperes. Make sure that bubbling is not too vigorous to push bubbles of gas to the middle (filling) arm of the Hoffman Apparatus.
- Allow the electrolysis to continue.
Observation
Turn the power supply off and disconnect the leads. Measure the amount of gas with the ruler.
- Make a match and light the candle. Open the stop cock on the cathode and collect the H2 in a test tube. Place your finger over the test tube’s top. Light the candle, then hold the match up to the mouth of the test tube. It should sound like a soft pop.
- Collect the O2 gas at the anode in another test tube. Light the splint in the candle and let burn for a few seconds. Blow the splint out and while it is still glowing insert it into the test tube. It should re-ignite the splint.
Result
When we place a lit candle near the mouth of one of the test tubes, the gas ignites and burns with a pop sound, indicating that hydrogen is present.
When we put a burning candle near the mouth of another test tube, it starts to burn brightly, indicating that the test tube contains oxygen.
The positive gas collected at the cathode is hydrogen, and the negative gas collected at the anode is oxygen.
At the anode: 2 H2O (l) → O2 (g) + 4 H+ (aq) + 4 e– (indicator yellow-acid)
At the cathode: 4 H2O (l) + 4 e– → 2 H2 (g) + 4 OH– (aq) (indicator blue-base)
Safety During Electrolysis of Water Experiment
- Be careful of explosive hydrogen and oxygen mixtures. It is a good idea to burn the gases off to prevent a dangerous mixture.
- Sodium Sulfate, Hydrochloric acid, and Sodium Hydroxide will irritate skin. Wear gloves and goggles.
- Handling this apparatus can be tricky and it takes some practice to set this demo up and the clean it up. Be careful not to break our Hoffman Apparatus.
- Burning the gases: making the pop and re-igniting the glowing splint is also tricky and requires some practice.
Read More: Electrolysis of Water
Reference
Source: Bassam Z. Shakhashiri (1992) Chemical Demonstrations: A Handbook for Teachers of Chemistry,Vol.4. p156.